
It’s Day Three of Garmin week, where we’re looking at some alternative GPS technology that can be used on a motorcycle and today we’re going to look at how to get an open source map (yesterday’s article) onto a bargain-priced Garmin Dakota 10 or 20, available online for just £111.99 or £160 respectively.
As previously explained, neither device comes preloaded with anything other than the Garmin basemap which is more or less unusable so we’re going to look at how to install the Talkytoaster UK routeable map onto both devices.
Now, before I go any further, please note that these are not intended to be comprehensive installation instructions for each and every GPS, but to get you started with the Dakota. Having said that, they’ll also work with most recent Garmin GPS, but if you’ve got a different brand, I’m afraid they won’t work. You’re also on your own if you don’t have a Windows PC – sorry about that but there are Linux and Mac utilities around. If anyone wants to mention some useful ones, I’ll do a tips and tricks roundup at the end of the series and pop it in there.
Right, back to our Dakota. Whilst I mentioned Monday that the Dakota 20 has a miniSD slot which means you can copy the maps to an inexpensive card (a 2Mb card will be good enough for most purposes and they are under a tenner, the Dakota 10 doesn’t have a miniSD slot, so you’re reliant on the 850 Mb of internal memory for adding maps, storing waypoints and routes and also on a PC link to upload said maps to the device. Downloading and installing the maps does require a little technical savvy, but if you can plug in a USB cable, download software, create directories and copy files, you really shouldn’t have too much trouble.
So, let’s download the maps. Head over to:
http://talkytoaster.info/ukmaps.htm
Scroll down the page to about half way and download either:
British-Isles+Contours-Routable-GMAPSUPP.zip
or
British-Isles-GMAPSUPP.zip
The difference between them is that the second doesn’t display contour information and so it’s about 130Mb smaller – that may be the better choice for the Dakota 10 as you’re limited to internal memory.
Unzip the archive, and make sure to save the unzipped file as GMAPSUPP.IMG.

It’s now time to upload it to your Garmin. Now, as we’re installing this to a new device, there’s no need to run a backup but if you’re following these instructions on a device you’re already using, be sure to save any mapsets you have already installed. Plug your Garmin USB cable* into the GPS and the PC, the Garmin Dakota (as well as Oregon and Colorado) will turn on, enter ‘mass storage mode’ and install itself as a device on your PC. Other Garmin models may need to be manually put into ‘mass storage mode’ via setup and interface. You can find more info on ‘mass storage mode’ here:
http://wiki.openstreetmap.org/wiki/OSM_Map_On_Garmin/Mass_Storage_Mode
IMPORTANT: *Make sure you ONLY use the Garmin cable out of the box to get the correct voltage to the GPS and avoid blowing it up!
In My Computer (or the equivalent in your version of Windows), find the blue triangle icon – mine’s labelled Garmin Oregon, and click on it. You should now see a folder called Garmin – click on that to open it and now it’s simply a case of dragging and dropping your GMAPSUPP.IMG file into the folder.
IMPORTANT: Uploading the GMAPSUPP.IMG to your Garmin folder [or miniSD card] will overwrite any existing mapset you have installed on the device using the same name, but will not affect the basemap.
Now, remove the cable, press the power button, the Dakota will turn itself back on and load the new map automatically.
If you have got hold of the Dakota 20 with the SD card slot, you have a choice. You can either use a card reader to copy the file to the miniSD card, or you can leave it in the GPS and plug it in like the Dakota 10 – the only difference is that you’ll see an extra removable drive which is the SD card. Open it, find the Garmin folder and drop the GMAPSUPP.IMG file in it. Then remove the cable and fire up to load the new map.
———————————————-
IF YOU’VE ENJOYED THIS ARTICLE, WHY NOT TAKE A LOOK AT OUR BOOKS?
The MAG Columns: this popular column has been running for nearly a decade in the Motorcycle Action Groups magazines, and are now available for the first time as a collection, updated and expanded, in one collection in either paperback or ebook format.
Over 40 articles deal with topics as diverse as recovering from a cornering mistake to safer overtaking, from overcoming tenseness to riding abroad, from riding in bad weather to coping with poor road surfaces.
Fascinating topics include the development and improvement of the mental skills we learn as we ride a bike.
Order ‘The MAG Columns’ direct from our publishers!
———————————————-
Now, you’ll probably want to see your new map in action. Take the GPS to where it can see the sky and turn it on, then when it’s booted press the MAP button (top left on the default screen), and lo and behold, you should see your new open source map in all its glory with a little triangle marking your location! You’ll see two transparent buttons on the map screen which are the zoom controls, and the screen is touch-sensitive so you can drag the map around. The X button bottom left will return you to the menu.

If you’ve ordered the handlebar mount too, that will be enough to allow you to clip the unit onto the mount and go riding with a scrolling map showing you where you are. One tip, although the mount clips in pretty securely, it is possible to slide it down into the mount and fail to push far enough to get it to lock into place, so I would suggest you attach the lanyard and loop it round something to stop it falling off – I actually poke the ignition key through it, which also serves to remind me to remove the GPS when I get off the bike.
If you want maps from outside the UK, then take a look at:
http://garmin.openstreetmap.nl/
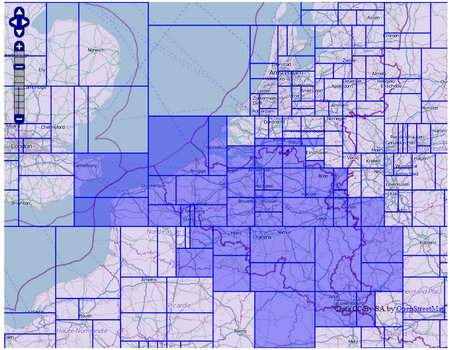
This site works slightly differently as it allows you to choose individual ’tiles’ to build your own mapped area. To see how it works, we’ll build a map of Belgium, Luxembourg and the area of Germany around the Nurburgring as well as the tile connecting Calais to England.
Choose the first option to set the map type: “generic routeable” then skip down to the third line and from the drop down menu marked “Europe”, select Belgium.
You’ll see the map below change with most of Belgium except Brussells highlighted, so enable manual tile selection from the forth line of options, then click on the Brussel tile in the middle of Belgium – it’ll turn blue and is now part of the mapset to be downloaded.
The Nurburgring is near Adenau and that tile’s already highlighted so we don’t need to add it but add the two missing bits of Luxembourg, and pick also the two tiles covering the corner of France nearest the UK. If you like, you can also remove a couple of tiles to the north which cover the Netherlands only. We’ve now got all we need to cover the ride from East Kent to Adenau.
The final stage is to request the map. It’s custom-built for you, so simply enter an email address (you can use a disposable email address but don’t make this up, because it’s where the download link will be sent!) and press “Build My Map”. You’ll get a confirmation telling you your ‘build’ is in the queue and an approximate delay (mine was 24 minutes) and when it’s ready you’ll get another email with the download link. Click on that, then grab the necessary files. You’ll need the xxxGMAPSUPP.ZIP file for the GPS, but whilst you’re there download the XXXWINDOWS.EXE file too – we’ll be using this one on PC software later in the week. These are fairly big downloads – around 0.5Gb in total so it’ll take a few minutes.
When you’ve got the map .IMG file, just upload it to the Garmin as already described – but remember, it’ll overwrite the UK map you created earlier, so make sure you have a copy of the orginal – to help remember either drop it into a labelled folder called something like “UK routeable map” or rename the file to something memorable. Boot up the Dakota and you should be away with a map of Europe. If the map’s blank, don’t be surprised – you’re probably not standing in Kent or Belgium! Zoom out then scroll across the map to somewhere you can see detail and zoom in again!
The other thing you might want to do is turn the brightness up. In bright sun, the trick is to angle the screen so it’s lit by the sunlight without reflecting straight in your eyes. As darkness falls, you can apply the backlight, which can be accessed by pressing the power button on the righthand side quickly, then using the + and = buttons to change the brightness. Press the power button quickly to exit back to whichever screen you were previously on.
More tomorrow on how to use the Dakota GPS for routing, both recording where you’ve been and planning routes to ride.

Hi Phil, sorry for the delay in replying. I’ve been on hols in wifi blackspot. In the last month, I’ve actually created a new map of the Netherlands and parts of Germany from the same location, loaded it onto my Oregon and it worked perfectly (except when I ran off the edge of it during an unexpected detour).
I’m at a loss to explain why it didn’t work. I’d suggest you repeat the procedure to ensure that the file didn’t get corrupted somehow.
Let me know if you solved it.
I’ve followed the instructions completely – I have downloaded a map from http://garmin.openstreetmap.nl/, unzipped it, and now have an SD card with the GMAPSUPP.IMG file for France copied onto it in the GARMIN directory. When I power up the Dakota 20 it does not recognise the French map. Any thoughts as to where I am going wrong? Or has something changed in the last year? Grateful for any help
Thank you – always nice to know the posts are useful. Hope you enjoy your GPS experience – they can be great fun and very useful!
JUST GOT THE DAKOTA 10 FOR XMAS, IV’E NOT HAD A GPS BEFORE AND WAS MORE THAN A LITTLE BAFFLED ON HOW TO DOWNLOAD MAPS BUT THANKS TO YOUR WEB SITE IV’E MANAGED IT.
GREAT POSTING THANKS!!!
Thanks Peter. To be fair to Garmin, it is sold with only the basemap – which as you say, is useless. That does mean you can install your own maps – many plump for the excellent quality but expensive OS maps. But having that choice means you’re aren’t locked into a single map, as is the case with the vast majority of Garmins and competitors’ in-car units. And ultimately if you build your own map from open source mapping, you’re saving quite a lot of cash, too.
Which is nice 🙂
excellent instructions – personally I think Garmin’s accompanying notes are a disgrace. There is no explanation or even an explanation of the how to use the Dakota 10 properly. Why fit it with a map that is next to useless!
Many thanks
Thanks Roy – there’s some advantage to not changing the format of these GPS units!
Hi This also works on Garmin GPSMAP 64
Thanks for the tips and guidance – I downloaded the map and it looks good. Will test tomorrow in the Walsh Boarders…
Brilliant! Glad the article was of use!
Wasted most of an afternoon trying to upload a useable map to my Garmin Dakota 10. Then sailed through it after finding your advice here, so hearty thanks for that.